SAML
Connect your SAML (Security Assertion Markup Language) identity provider as a single sign-on (SSO) method.
SAML is an open standard for SSO authentication (among other things). Sign-ins are shared across multiple service providers and managed by a central identity provider (IdP).
In this case, the service provider is Zammad, and the IdP is a software service that you either host or subscribe to (e.g., Keycloak, Redhat SSO Server, ADFS, or Okta).
This guide assumes you are already using SAML within your organization (i.e., that your IdP is fully set up).
Warning
Please note: Our instructions are based on connecting Zammad with Keycloak.
Step 1: Configure Your IdP
Add Zammad as a client/app
Import Zammad into your IdP using the XML configuration
found at https://your.zammad.domain/auth/saml/metadata.
If your IdP doesn’t support XML import, you will have to configure Zammad as a new client/app manually using the above XML metadata file for reference.
For instance, when you see this tag:
<md:AssertionConsumerService Binding="urn:oasis:names:tc:SAML:2.0:bindings:HTTP-POST" Location="http://your.zammad.domain/auth/saml/callback" index="0" isDefault="true"/>
Set the Assertion Consumer Service Binding URL
(sometimes also listed as Valid Redirect URIs)
to http://your.zammad.domain/auth/saml/callback.
Set up user attribute mapping
Zammad requests the following user attributes (or “properties”) from the IdP:
Email address (
email)Full name (
name)Given name (
first_name)Family name (
last_name)
You may need to set up “mappers” (or “mappings”) to tell your IdP how user attributes in SAML correspond to those in Zammad. For a more detailed breakdown, refer to the XML metadata file referenced in the previous section.
Per-IdP Instructions
- Keycloak
To add Zammad as a client, save the XML configuration to disk (
https://your.zammad.domain/auth/saml/metadata) and use Clients > Clients list > Import client in the Keycloak admin panel.To help Zammad match its own user accounts to Keycloak users, create a user attribute (or “property”) mapper. In Clients list, click on your newly created Client ID, choose the tab Client scopes and click on the link which refers to your Zammad instance. Choose Add mapper > By configuration > User Property and create a mapper with the following entries:
Name
emailMapper Type
User PropertyProperty
emailAddressSAML Attribute Name
emailSAML Attribute NameFormat
basicIn the example above, we’re telling Zammad that whenever it receives a SAML login request, it should take the
emailproperty from Keycloak, look for a Zammad user with the sameemailattribute, and create a new session for that user.If your Keycloak users’ email addresses are stored on another property (e.g.,
username), adjust accordingly.Back in Settings, enter the Client ID (
https://your.zammad.domain/auth/saml/metadata) in the field Master SAML Processing URL.You also need to enable Sign assertions.
Step 2: Configure Zammad
Enable SAML and enter your IdP’s details in the Admin Panel under Settings > Security > Third Party Applications > Authentication via SAML:
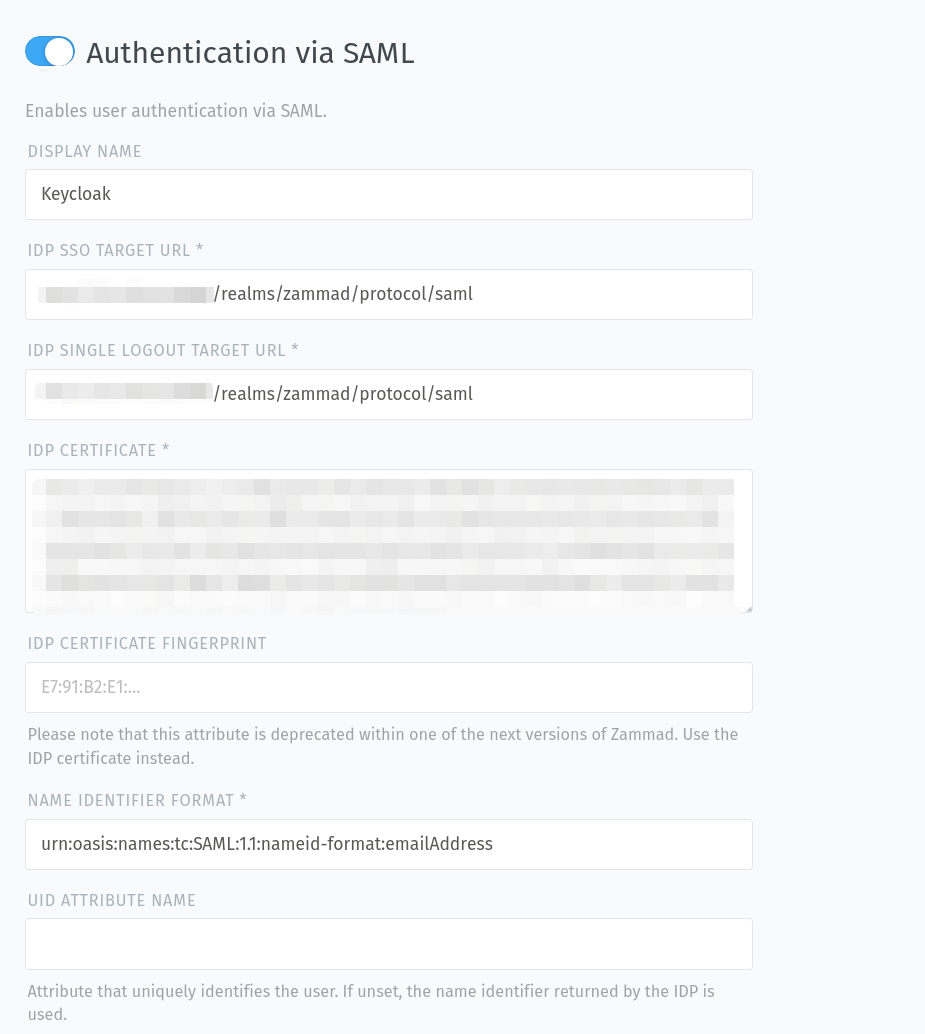
- Display name
Allows you to define a custom button name for SAML. This helps your users to understand better what the button on the login page does.
Defaults to
SAML.- IDP SSO target URL
This is the target URL Zammad shall redirect to when the user presses the SAML button. For Keycloak, this needs to look like https://your.domain/realms/your-realm/protocol/saml
- IDP single logout target URL
This is the URL to which the single logout request and response should be sent.
- IDP certificate
The public certificate of your IDP for Zammad to verify during the callback phase.
- IDP certificate fingerprint
The fingerprint of your IDPs public certificate to verify during callback phase.
Note
🔏 For the IdP certificate / certificate fingerprint:
Provide only one or the other—do not provide both! (Between the two, we recommend the signing certificate itself: fingerprints use SHA-1, which has been broken for a while now.)
Keycloak users: Find your certificate in the Keycloak admin panel under Realm Settings > Keys > Algorithm: RS256 > Certificate.
- Name identifier format
This is the unique identifiers field type. Usually it should be
urn:oasis:names:tc:SAML:1.1:nameid-format:emailAddress.Zammad expects an email address as unique identifier!
- UID attribute name
Here you can define an attribute that uniquely identifies the user. If unset, the name identifier returned by the IDP is used.
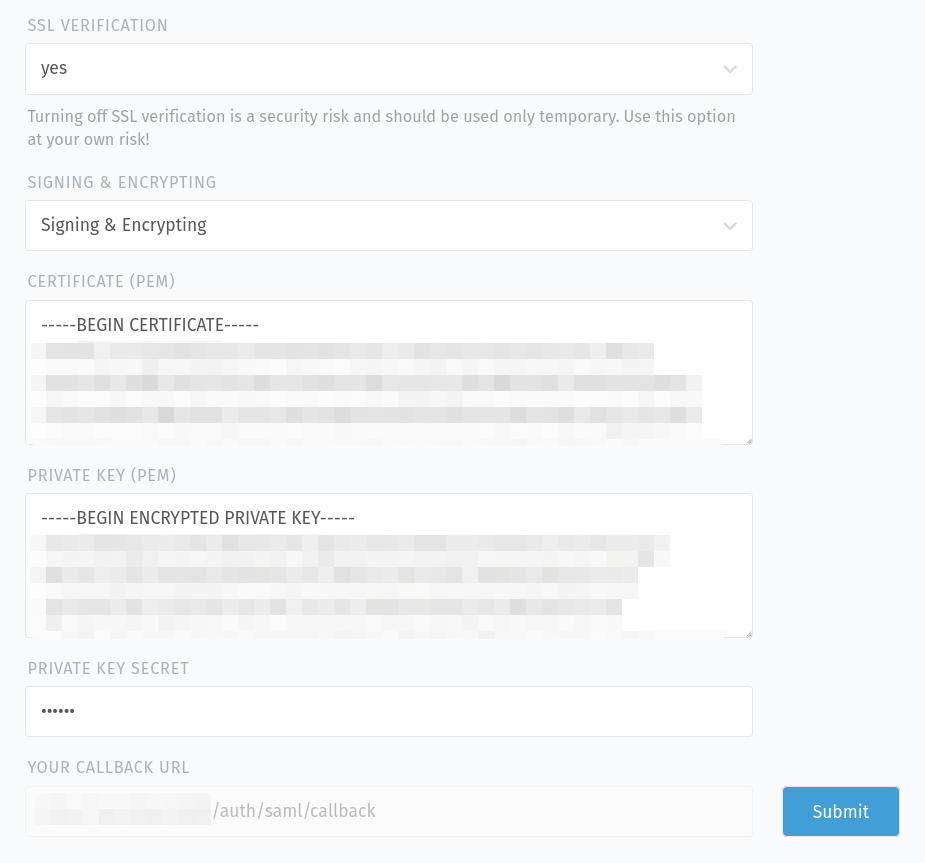
- SSL verification
Decide if the certificate for the connection to the IdP service has to be verified or not (default:
yes).Danger
Please be aware that turning off SSL verification is a security risk. It should only be used temporarily or for testing purposes. If turned off, there is no verification of the certificate, which means that any presented certificate will be accepted.
- Signing & Encrypting
Define if you want to sign, encrypt, do both or nothing for the requests.
- Certificate (PEM)
Paste the public certificate of your Zammad SAML client, if you want to enrypt the requests.
- Private key (PEM)
Paste the private key of your Zammad SAML client here, if you want to sign the requests.
- Private key secret
If your private key is secured with a secret, you can provide it here.
- Your callback URL
This URL is needed for your IdP configuration so it knows where to redirect to after successful authentication.
Hint
After saving your input by clicking on the “Submit” button, Zammad verifies the provided keys/certificates (e.g. if they are valid for signing/encrypting and if they aren’t expired).
See automatic account linking for details on how to link existing Zammad accounts to IdP accounts.
Troubleshooting
- Automatic account linking doesn’t work
Have you double-checked your IdP’s user attribute mapping configuration?