SAML
Connect your SAML identity provider as a single sign-on (SSO) method.
Note
🤷 What is SAML?
SAML is an open standard for SSO authentication (among other things). Sign-ins are shared across multiple service providers and managed by a central identity provider (IdP).
In this case, the service provider is Zammad, and the IdP is a software service that you either host or subscribe to (e.g., Keycloak, Redhat SSO Server, ADFS, or Okta).
This guide assumes you are already using SAML within your organization (i.e., that your IdP is fully set up).
Step 1: Configure Your IdP
Add Zammad as a client/app
Import Zammad into your IdP using the XML configuration
found at https://your.zammad.domain/auth/saml/metadata.
Note
🙋 What if my IdP doesn’t support XML import?
You will have to configure Zammad as a new client/app manually using the above XML metadata file for reference. For instance, when you see this tag:
<md:AssertionConsumerService Binding="urn:oasis:names:tc:SAML:2.0:bindings:HTTP-POST" Location="http://your.zammad.domain/auth/saml/callback" index="0" isDefault="true"/>
Set the Assertion Consumer Service Binding URL
(sometimes also listed as Valid Redirect URIs)
to http://your.zammad.domain/auth/saml/callback.
Set up user attribute mapping
Zammad requests the following user attributes (or “properties”) from the IdP:
- Email address (
email) - Full name (
name) - Given name (
first_name) - Family name (
last_name)
You may need to set up “mappers” (or “mappings”) to tell your IdP how user attributes in SAML correspond to those in Zammad. For a more detailed breakdown, refer to the XML metadata file referenced in the previous section.
Per-IdP Instructions
- Keycloak
To add Zammad as a client, save the XML configuration to disk (
https://your.zammad.domain/auth/saml/metadata) and use Clients > Create > Import in the Keycloak admin panel.To help Zammad match its own user accounts to Keycloak users, create a user attribute (or “property”) mapper:
Clients > https://your.zammad.domain/auth/saml/metadata > Mappers > Create Name EmailAddress-Email Mapper Type User Property Property emailAddress SAML Attribute Name email SAML Attribute NameFormat basic In the example above, we’re telling Zammad that whenever it receives a SAML login request, it should take the
emailAddressproperty from Keycloak, look for a Zammad user with the sameemailattribute, and create a new session for that user.If your Keycloak users’ email addresses are stored on another property (e.g.,
username), adjust accordingly.
Step 2: Configure Zammad
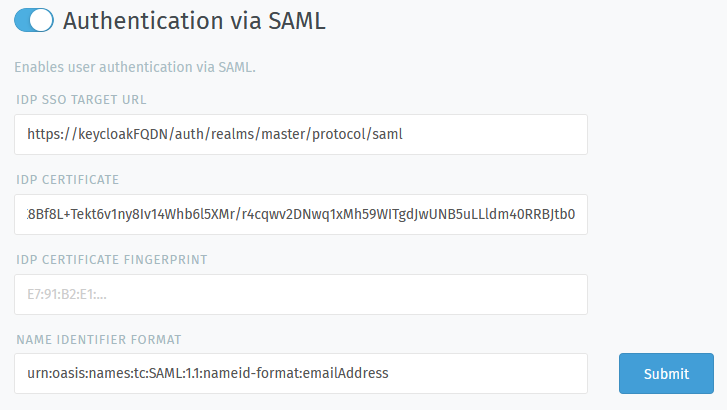
Enable SAML and enter your IdP’s details in the Admin Panel under Settings > Security > Third Party Applications > Authentication via SAML:
Note
🔏 For the IdP certificate / certificate fingerprint:
Provide only one or the other—do not provide both! (Between the two, we recommend the signing certificate itself: fingerprints use SHA-1, which has been broken for a while now.)
Keycloak users: Find your certificate in the Keycloak admin panel under Realm Settings > Keys > RSA > Certificate.
See automatic account linking for details on how to link existing Zammad accounts to IdP accounts.
Troubleshooting
- Automatic account linking doesn’t work
- Have you double-checked your IdP’s user attribute mapping configuration?