Account Setup
Setting up a new email account? Here’s what all the settings do.
☠️ But first, a word of warning! The import process does things you might not expect:
Danger
By default, Zammad will delete all emails in your inbox during the import process. Use the Experts dialog to disable this behavior.
Zammad will send an auto-reply message to every email it imports (including the old ones!). Use the Experts dialog to change this behavior or to disable auto-replies prior adding an email account and to turn it back on once all your messages have been imported.
Note
- Gmail / G Suite users:
To add a Google account, create a dedicated Google channel.
- Microsoft 365 users:
To add a Microsoft 365 account, create a dedicated Microsoft 365 IMAP Email channel or Microsoft 365 Graph Email channel.
Basic
In most cases, Zammad is smart enough to figure out your email provider’s configuration based on your email address alone. If the correct configuration could not be retrieved, Zammad asks you to provide the correct parameters manually.
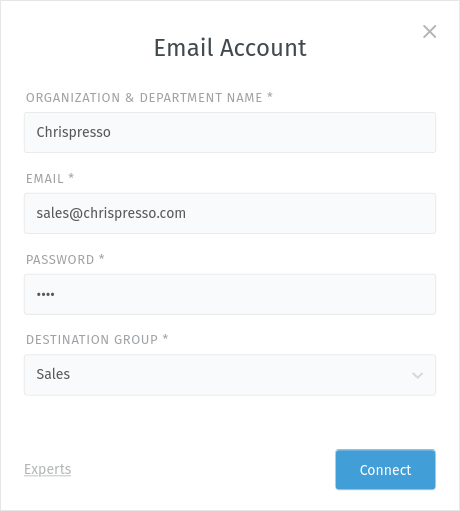
Basic email account setup inbound
- Organization & Department Name
The display name used for outgoing email.

A customer’s inbox with an auto-reply from Chrispresso Sales.
If you add multiple addresses to a single account, you can define a separate Organization & Department Name for each one.
Email display names value can be further customized in the Settings tab.
Your email address.
If your account login/username is different from your email address, use the Experts dialog (see below).
If your inbox receives mail for more than one email address, be sure to add your alternate addresses after account setup.
- Password
Your account password.
- Destination group
The group that incoming emails will be assigned to.
Use filters for more fine-grained sorting of incoming email.
- Destination group > Sending email address
Decide if the email address should be assigned to the selected group for outgoing emails.
Change to channel email address will add this email address to the group for outgoing emails. This may overwrite an already assigned email address.
Do not change email address doesn’t assign an email address to the group or change it. If the group has no assigned email address, it stays empty. If the group already has an assigned email address, it will stay the same.
Experts
If Zammad can’t figure out how to connect your account (or if you just want to access advanced settings), use the Experts dialog.

Expert configuration dialog
Email Inbound
- Type
Choose from IMAP and POP3.
In most cases, you want IMAP. (With POP3, you won’t be able to keep messages on the server or specify which folder to fetch from.)
- Host
Your email server’s hostname or IP address (e.g.
imap.gmail.com).Contact your email provider or system administrator if you don’t know.
- User
This field is being pre-filled with your email address in case you’ve provided one before opening the expert settings.
Adjust this setting in case your username and email address differ.
- Password
Your account password.
- SSL / STARTTLS
Enable encryption when fetching messages.
You can choose from the following options:
No SSL (not recommended!)
SSL
STARTTLS
- SSL verification
Here you can decide if the certificate of the email server has to be verified or not (default:
yes). In case you are using custom certificates, please have a look at how to add them to Zammad.Danger
Please be aware that turning off SSL verification is a security risk. It should only be used temporarily or for testing purposes. If turned off, there is no verification of the certificate, which means that any presented certificate will be accepted.
- Port
Your email server’s port (usually
993for IMAP, or995for POP3).Contact your email provider or system administrator if you don’t know.
- Folder
Specify which folder to fetch from, or leave empty to fetch from
INBOX.If specifying a nested folder, be sure to use the full path. (Some systems use different path separators; e.g.,
Inquiries/Tech-Supportvs.Inquiries.Tech-Support. Contact your email provider or system administrator if you don’t know.)If you selected a folder, additional steps may be required: In the last step of the account setup process, Zammad sends you an email from your own account, then waits for it to appear in the folder specified here. Account verification will not complete until this test message has been received.
If this folder does not receive incoming messages automatically, you may have to manually check your inbox during the verification step and move Zammad’s test message there when it arrives.
- Keep messages on server
Specify what happens to your emails after Zammad imports them:
no: Zammad deletes all imported messagesyes: Zammad marks imported messages as read. With this option, Zammad will only import unread messages. This means Zammad may miss messages if the mailbox is externally modified.
Note
Why does Zammad delete messages by default?
If you never clean up your inbox, you reach a storage limit some day and your mail server will start rejecting incoming messages.
If you choose yes here, remember that it’s your responsibility to clean out your inbox from time to time to keep it below its storage limit.
- Archive Mode

How should old emails be imported?
During the process of setting up an email based channel, Zammad checks if emails are present in the inbox. If Zammad detects at least one email, the archive mode dialog is triggered and the archive mode is turned on by default. This dialog is also present if you edit an existing email based channel. The archive mode lets you:
Set an archive cut-off time, which means: older emails are imported in archive mode, newer ones as standard tickets (including auto-reply messages and in state “new”).
Select a target state for the archived emails: in most cases you might want to import these archived emails in “closed” state. However, if your use case is different, you can choose another one which fits for you.
By archiving emails, their creation date and time is preserved and no automatic actions (e.g. trigger with auto-reply) will take place. If imported as regular tickets, the date and time is always the time of the import.
To import all emails as regular tickets, just turn the archive mode toggle off.
Danger
If you turn off the archive mode, Zammad treats all emails (even old ones) as if they had been sent today. This means senders will receive auto-replies and tickets are created with state “new” for each message.
If you want to differentiate even more, you have to do it manually and disable things like triggers before adding an email account, depending on your use case.
Email Outbound

Configuration dialog of email channel outbound
- Send mails via
Choose from SMTP and local MTA (e.g. Sendmail).
Local MTA (mail transfer agent) configuration is only available on self-hosted installations.
- Host
Your email server’s hostname or IP address (e.g.
smtp.gmail.com).- User
Your account login/username.
Leave blank to use the same value from incoming account setup.
- Password
Your account password.
Leave blank to use the same value from incoming account setup.
- Port
Your email server’s port (usually
587or465).Zammad will detect and enable SSL/STARTTLS support automatically.
- SSL verification
Here you can decide if the certificate of the email server has to be verified or not (default:
yes). In case you are using custom certificates, please have a look at how to add them to Zammad.Danger
Please be aware that turning off SSL verification is a security risk. It should only be used temporarily or for testing purposes. If turned off, there is no verification of the certificate, which means that any presented certificate will be accepted.
Verification

As a final step, Zammad sends a test email from your own account,
to your own account, and to verify-external-smtp-sending@discard.zammad.org
which discards the test mail right away.
We’ve created a landing page for discard.zammad.org which describes the backgrounds as well.
This this Zammad ensures that your email account is capable of sending internal and external - once this is verified the setup process is complete! 🎉
Hint
If you did not assign the email address to the group, make sure to check now if the correct email address is assigned to the group.
Otherwise, the agents in this group will not be able to send e-mails.