AI Agents
To help your agents focusing on more important tasks, you can create AI agents
which can take over routine tasks. These AI agents are managed in Zammad’s
admin settings under AI > AI Agents and require admin.ai_agent permission.
Make sure to configure an AI provider before activating the
feature. Otherwise, a warning message will tell you to do so.
While an AI agent works on a ticket, an avatar is displayed in the live user section in the bottom bar of the ticket detail view, see example below. In such a short period of time, the agents should not apply changes to the ticket because they could get overwritten.

Avatar of an AI agent which shows up in the live user section.
Important Information
AI agents don’t run on their own. They have to be invoked by a trigger, a scheduler job or a macro with the action AI > AI Agent.
By creating a macro with an AI agent action, your agents can run it on demand.
If an AI agent applies changes to a ticket, you can find an entry in the ticket history with the name of the AI agent.
Manage AI Agents
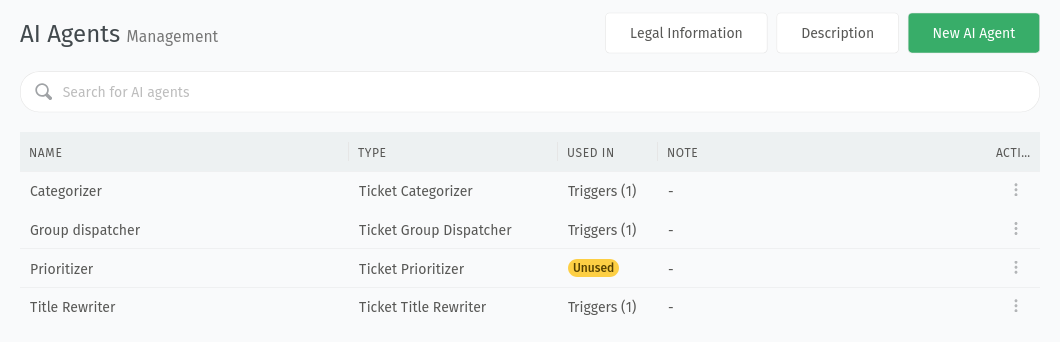
Create an AI agent by clicking the New AI Agent button in the top right
corner. This opens a wizard where you can choose the type of the agent and
additional settings based on the selected type, see AI Agent Types for
details. The action column with the ︙ button allows you to clone or delete an
AI agent. You can only delete AI agents which are not used in triggers,
scheduler jobs and macros. Check the Used in column and hover over an
entry to see where an AI agent is used.
AI Agent Types
Define your AI agents and use them afterwards in triggers, scheduler jobs or macros. An example for a trigger configuration could look like this:
Activated by: Action
Action execution: Selective
Conditions for affected objects: Action is
createdExecute changes on objects: AI Agent > Select your AI agent
Hint
Depending on the agent type, you can limit the available options for the AI agents. If you do so, make sure to select at least two options the agent can choose from.
Ticket Categorizer
This AI agent is capable of assigning categories to tickets. Because there is no built in category field in Zammad, you first have to create a custom ticket attribute in which you want to track the ticket’s category. The field type must be one of the select types.
The ticket categorizer AI agent uses the content of all articles and the title to compare it with your category names (and optionally descriptions). To add descriptions for your categories, limit the categories the AI agent can choose from. Then add the categories which should be available for the AI agent and optionally provide a description for them. Additionally, you can decide in the wizard if multiple values are allowed (only if category field is a multi-select field type).
Ticket Group Dispatcher
This AI agent is capable of assigning tickets to different groups. It compares the content of the ticket in question with your group names (and optionally descriptions). To add descriptions for your groups, limit the groups the AI agent can choose from. Then add the groups which should be available for the AI agent and optionally provide a description for them.
Ticket Prioritizer
This AI agent is capable of setting a ticket priority based on the title of the ticket and the content of the last article. You can choose to use all priorities or limit them to specific ones. In case you limit the priorities, you can also provide a description for each priority the AI agent can choose from.
Ticket Tagger
This AI agent is capable of assigning tags to tickets. The instructions are pre-filled with a general example so you can easily adjust them to your use case. The instructions are separated into three sections:
General tagging principles: Here you can give general instructions how tickets should be tagged and how they are used in your organization.
Priority tagging rules: Rules about how specific the tags should be and which tags are preferred in case of multiple fitting tags.
New tag strategy: Define instructions on how the agent should deal with existing and new tags (e.g. prefer existing tags over new ones). This configuration option is only available if new tags are allowed in your system.
After adjusting the instructions, you have to configure the assigning mode and specify a number of tags for the chosen option. The available Tag assignment mode options are:
Add to existing tags: existing tags remain unchanged and the AI agent adds the specified number of tags to the ticket.
Total shouldn’t exceed: the total number of tags in the ticket should not exceed the configured number of tags.
Replace existing tags with: This option removes all existing tags in the ticket and adds the specified number of tags.
Ticket Text Extractor
This AI agent is capable of extracting specific information from the ticket’s content. You can use it to extract information such as a product name, an order number, a serial number or any other information you want. Another way without using AI is to use Filters for email based channels.
Make sure to have a custom ticket attribute in which you want to store the extracted information. Otherwise, create a suitable one before configuring the AI agent. The field type must be one of the following:
Text
Textarea
Integer
Single selection
Single tree selection
For select-type attributes, the wizard allows you to limit the options the AI agent can choose from and to add descriptions for them. For these types, the AI agent also receives the list of allowed options to choose from in case of a match.
Extraction Rules
Here you tell the agent what information to extract. It is highly recommended to provide some examples and include different variants of how the information might appear in the ticket. The wizard includes a default example for extracting an order number. Replace or adjust it to your own use case. You can find a few examples in the Examples section below as inspiration.
Priority Rules
The priority rules tell the agent how to deal with multiple matches. There is a default example that should cover common scenarios. Adjust it if your scenario differs.
Example priority rules:
If multiple matches are found, prioritize based on the following rules:
- If one of the matches is in the ticket title, prioritize that one.
- If there are multiple matches in the same article, prioritize the one that appears first in the text.

Always return only one match.
Article(s) to Analyze
Choose between:
All articles
Last article (newest)
First article (oldest)
Depending on the way, time and condition an AI agent runs, the relevant article(s) can be different. In most cases, Last article (newest) should be fine. In certain cases, however, it might make sense to use another option. For example, if the agent is triggered manually by a macro, All articles could fit as well.
Examples
Expand the following code block to see these extraction rules examples:
Extract order number
Extract contact person for insurance claim
Extract product name
Extract Order Number
--------------------

Extract value of an order number from the input.

The value may be provided in one of the following formats:
- Order#1234567
- Order No: 1234567
- Order number: 1234567

Take only the number as the value, without any additional text.

Priority rules:

If multiple matches are found, prioritize based on the following rules:
- If one of the matches is in the ticket title, prioritize that one.
- If there are multiple matches in the same article, prioritize the one that appears first in the text.

Always return only one match.

#########################################################################

Extract Contact Person for Insurance Claim
------------------------------------------

Extract name of the contact person for an insurance claim. This should be the person who is insured by an active policy.

The name may be mentioned in one of the following contexts:
- Someone claiming on the insurance policy for themselves
- Someone claiming on the insurance policy on behalf of another person
- A colleague asking for help with an insurance claim that was originally sent by someone else

Consider only the name of the person who is actually insured, no matter who is claiming against their policy.

In case the request is not an insurance claim, return an empty string.

#########################################################################

Extract Product Name
--------------------

Extract name of the affected product from the input.

The value may be one of the listed values (exact match), or one that resembles one of the listed values (partial match).

Take only the product name as the value, without any additional text.
Ticket Title Rewriter
This AI agent is capable of rephrasing the ticket title based on the content of the last article. The title is not considered by the agent and gets completely rewritten. This can be useful if your customers often send requests with unclear subjects or if you have a specific channel which only creates tickets with generic titles (e.g. from a web form).