Basic Setup
To set up a new Google email channel in Zammad, you first have to create an OAuth client in Google’s Cloud console. Then you can connect Zammad with your Google account and add as many mailboxes to Zammad as you want.
If you already set up Google email channels via IMAP in Zammad, you can easily migrate them to a Google channel. Follow the steps below but skip the step “Add Account” and proceed with Migrate from Email Channel.
Configure OAuth App
Sign in to the Google Cloud console.
Create a new app if you don’t have one already.
Go to APIs & Services > OAuth consent screen and create an OAuth client.
Choose Web application as type, provide a fitting name and add a redirect URI. You can find the redirect URI in the Google account settings dialog of Zammad by opening the configuration dialog via the
Connect Google Appbutton (called Your callback URL).After saving your OAuth client, a dialog will be shown with the Client ID and the Client secret. Copy and add them to Zammad’s app configuration dialog.
Save the app configuration in Zammad by clicking the
Submitbutton in the dialog.Switch back to Google’s Cloud console and go to APIs & Services > Enabled APIs & Services. Click the button to add an API, search for
Gmail APIand select and enable it.Go to OAuth consent screen > Data Access and add a scope. Search for
Gmail APIand activate the API with the scopehttps://mail.google.com/. Confirm and save it.
Now, you are technically ready to connect a Gmail mailbox to Zammad. Depending on your scenario, you should also have a look at the Audience section in the Cloud console. Either add a test account for the app or publish it for production use.
Add Account
After you’ve registered an OAuth app, you can connect Gmail accounts to Zammad.
Danger
By default, Zammad will delete all emails in your inbox during the import process. Use the Keep Messages on Server setting to disable this behavior or enable archive mode.
Zammad will send an auto-reply message to every email it imports (including the old ones!). Make sure to disable this behavior prior adding an email account and to turn it back on once all your messages have been imported.
To connect your Google account, click on Add Account in Zammad. You will be
redirected to a consent dialog. Click through the screens and make sure
to select the desired Google account as well as to grant the permission for
email handling as you can see in the following screenshot.

After clicking on Continue, you are redirected to Zammad where you can see a
dialog for specifying some settings for the channel:

- Destination group
The group that incoming emails will be assigned to.
Use filters for more fine-grained sorting of incoming email.
- Destination group > Sending email address
Decide if the email address should be assigned to the selected group for outgoing emails.
Change to … will add this email address to the group for outgoing emails. This may overwrite an already assigned email address.
Do not change email address doesn’t assign an email address to the group or change it. If the group has no assigned email address, it stays empty. If the group already has an assigned email address, it stays the same.
- Folder
Specify which folder (or label) to fetch from, or leave empty to fetch from
INBOX. If specifying a nested folder, be sure to use the full path, e.g.Inquiries/Tech-Support.- Keep messages on server
Specify what happens to your emails after Zammad imports them:
no: Zammad deletes all imported messagesyes: Zammad marks imported messages as read. With this option, Zammad will only import unread messages. This means Zammad may miss messages if the mailbox is externally modified.
Note
Why does Zammad delete messages by default?
If you never clean up your inbox, you reach a storage limit some day and your mail server will start rejecting incoming messages.
If you choose yes here, remember that it’s your responsibility to clean out your inbox from time to time to keep it below its storage limit.
- Archive Mode
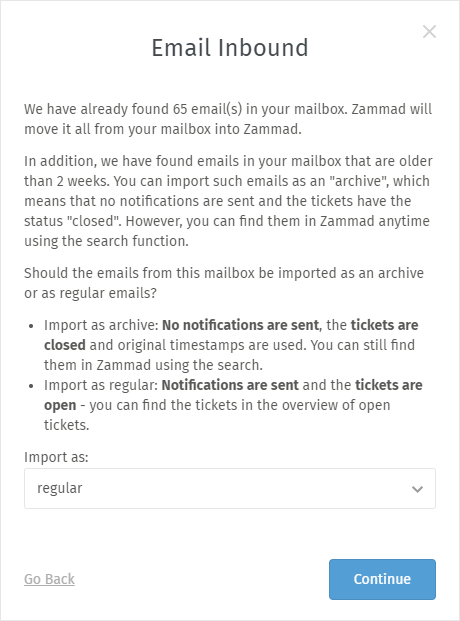
How should old emails be imported?
During the process of setting up an email based channel, Zammad checks if emails are present in the inbox. If Zammad detects at least one email, the archive mode dialog is triggered and the archive mode is turned on by default. This dialog is also present if you edit an existing email based channel. The archive mode lets you:
Set an archive cut-off time, which means: older emails are imported in archive mode, newer ones as standard tickets (including auto-reply messages and in state “new”).
Select a target state for the archived emails: in most cases you might want to import these archived emails in “closed” state. However, if your use case is different, you can choose another one which fits for you.
By archiving emails, their creation date and time is preserved and no automatic actions (e.g. trigger with auto-reply) will take place. If imported as regular tickets, the date and time is always the time of the import.
To import all emails as regular tickets, just turn the archive mode toggle off.
Danger
If you turn off the archive mode, Zammad treats all emails (even old ones) as if they had been sent today. This means senders will receive auto-replies and tickets are created with state “new” for each message.
If you want to differentiate even more, you have to do it manually and disable things like triggers before adding an email account, depending on your use case.
After successfully adding the Google account, you can adjust the default group Zammad is going to assign incoming new tickets to.

Only active groups will be displayed. Changing this setting will not reassign existing tickets to the new group.
Migrate from Email Channel
Convert Email Channel to Google Channel
Zammad provides a migration logic that allows you to migrate existing Google accounts from an email channel into a Google channel.
Note
Zammad is expecting specific settings.
In order for Zammad to display the migration option, it expects the channels
hostname to be imap.gmail.com for IMAP and smtp.gmail.com for SMTP.
The easiest way to start the migration is to Configure OAuth App for your Google accounts before migrating. However, if you don’t, Zammad will ask you to provide your app credentials before allowing you to continue.
If you’re ready to go, simply click on the Migrate now! button in the red
banner of the email channel in question. Zammad will redirect you to
Google and request you to authenticate and consent to said account.
After you pressed next you’ll be redirect to Zammad’s Google channel overview. Your channel, if successful, is now migrated to an Google channel.
Rolling Back the Migration
In case something went wrong, Zammad allows you to roll back the migration
for up to 7 days. You can do so by using the Rollback migration button in
the account details. For this time period, Zammad will remember your original
credentials and restore it if needed. These information will be removed
entirely after 7 days.
Troubleshooting
- My OAuth credentials stopped working
Did you recently change your Google password? Google invalidates all your OAuth tokens whenever you change it.
- How to use the Gmail account for outgoing system notifications?
On subscription/cloud-hosted instances, you can’t do that. Notifications will always come from “Notification Master <noreply@your.zammad.domain>”.
On self-hosted instances, we still don’t recommend it. Using a Gmail account for automated, outgoing messages is risky: users who exceed Google’s email sending limits can have their accounts suspended.
Set up a generic email channel instead and use the Email Notification setting.
- I successfully added my account, but Zammad isn’t fetching new emails
If you specified a custom folder/label to fetch from, are you sure incoming mail is arriving in that folder?