Списак задатака
The checklist feature allows agents to keep track of the tasks to be completed.
It is activated by default and shows up in another tab in the right sidebar
in the ticket detail view (see here how it
looks like from agent’s perspective). To manage the checklist feature in
Zammad’s admin settings under Manage > Checklists, you need the
admin.checklist permission.

Употреба
За укључивање/искључивање функције, једноставно пребаците прекидач под називом Укључи спискове задатака при врху стране.
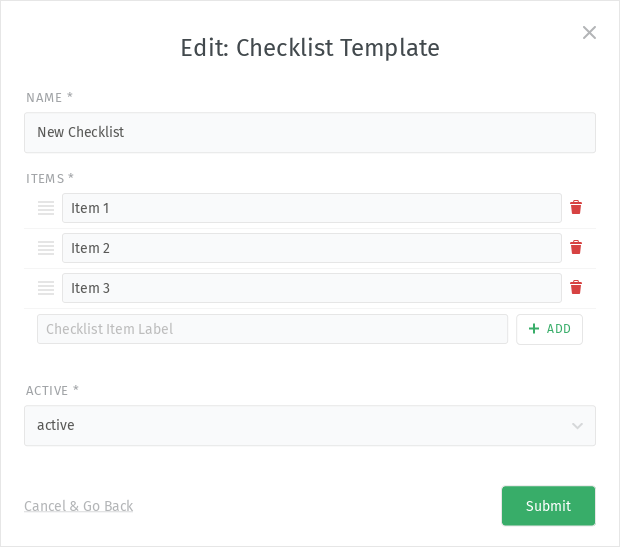
Optionally, you can create one or more templates with predefined checklist
items. To do so, click on the New Checklist Template button and define
the checklist name and items. After submitting the form, the template can be
used in tickets.
To clone or delete a template, use the ︙ button and select the corresponding action. To edit the template, simply click on the name of the template. This opens a dialog where you can edit the checklist and the items (add, rename, reorder, delete them) and set the entire template to active/inactive.
Напомене
Могуће је додати само један списак задатака по тикету.
There is no specific agent permission for the checklist feature. You can turn it on or off and optionally provide checklist templates.
Уколико оператер има приступ тикету, имаће приступ и списку задатака.
Уколико оператер има само дозволу прегледа тикета, списак задатака ће бити приказан у режиму читања.
Клијенти немају приступ списковима задатака и неће моћи да их виде.
An agent can always overwrite and adjust the checklist, even a deletion is possible. This also applies to checklists which got added from a template.
Спискови задатака су тренутно одвојена функција. То значи да не можете приступити задацима или њиховом стању са других места у Zammad-у као што су окидачи или радни токови.